Monday 28 December 2015

Retribution Paladin Proving Ground Endless DPS

endless wave 123 screenshot

hi everyone, hope you all have an enjoyable Christmas last weekend.

i decided to give proving ground endless dps a run on Sunday. i did better in dps as compared to the healer/tank proving ground but i didn't expect to go above wave 100 so smoothly.


CD Planning

the most important thing you need to prepare is to decide when to use your major cooldown. there are only 10 different waves and it keeps repeating itself so we should stick to the same strategy. for example, wave 11 is same as 1, and wave 12 is the same as wave 2, but mobs hp increased by 10%.

every wave is 1 minute long, which is why we can (and should) use our CD so often. i feel it is easier to split up my CD so that i have something to use on almost every wave.

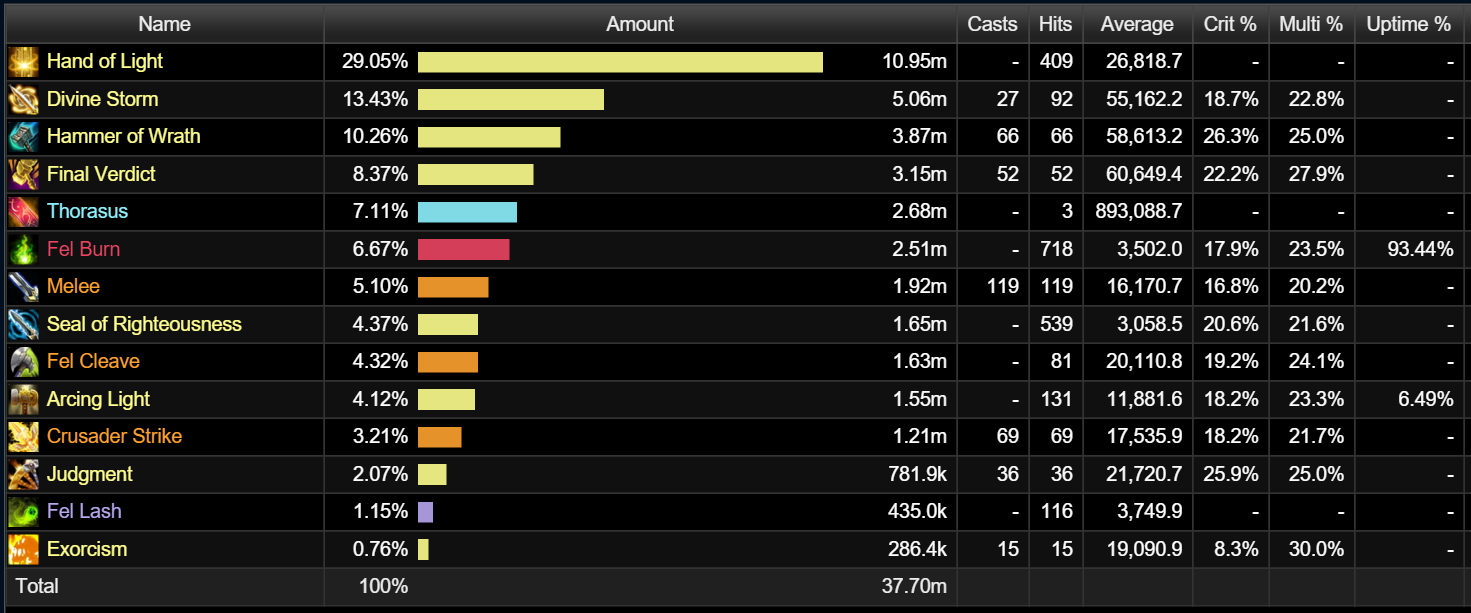
CD combo 1 = Thorasus, the Stone Heart of Draenor + Holy Avenger
CD combo 2 = Light's Hammer + Avenging Wrath

the hardest wave in my opinion (without using CD) is 10 > 5 > 4 > 9

CD combo 1 is stronger so i plan to use this combo for the 2 boss fight, which is wave 5 and wave 10. this also means CD combo 1 can be re-use for wave 3 and wave 8.

CD combo 2 can be use on wave 4 and wave 9. and it will also be available for wave 2 and 6.

the arrangement of CD does not have to be the best setup because the main idea is to form a habit. practise a few times for efficiency and everything will automatically became easier after it gets into your muscle memory. for example, this is my plan:

wave 1 - Light's Hammer
wave 2 - Light's Hammer + Avenging Wrath
wave 3 - Thorasus, the Stone Heart of Draenor + Holy Avenger
wave 4 - Light's Hammer + Avenging Wrath
wave 5 - Thorasus, the Stone Heart of Draenor + Holy Avenger
wave 6 - Light's Hammer + Avenging Wrath
wave 7 - Light's Hammer
wave 8 - Thorasus, the Stone Heart of Draenor + Holy Avenger
wave 9 - Light's Hammer + Avenging Wrath
wave 10 - Thorasus, the Stone Heart of Draenor + Holy Avenger

very important note - make sure you keep to your plan as faithfully as possible. if you forget to use the CD, just forget it and move on, do not try to use it at the wrong time and screw up your own plan later.

by right, we can use the Light's Hammer in every single wave. but you must throw it down a few seconds before the wave actually begun, otherwise it will not be ready for the next wave. however, i would advise you NOT to use Light's Hammer on wave 3, wave 5 and wave 8, because it is critical for wave 4, wave 6 and wave 9.


BiS Gears

i am not sure what is "BiS" for proving grounds but i know it is very similar to CM dungeon.

because:

1) tier set does not work
2) sockets does not work
3) mobs will scale with our item-level accordingly.

however:

1) legendary ring works

since it is similar to CM, i went ahead to equip all my CM gears, which is my haste & mastery set. but i swap 1 of my CM ring into the legendary ring.


Trinkets

just for your info, i am simply using my CM gears, and my CM trinkets are EDH and DC.

although i have a feeling it might be best to use 1 passive and 1 on-use trinket (scabbard or vial) instead. but i didn't really have time to test these choices because it takes 1 hour to reach wave 60 and 2 hours to reach wave 120.

the higher waves (100+) is where things matters but it is too time-consuming to test out these trinkets... imagine 1 hour of proving ground to test 1 trinket!

therefore, i did not plan for trinkets at all. come to think of it, perhaps it doesn't really matters much, since i can go above wave 100 with EDH and DC, it should be good enough, right? lol


Talents / Specs

Pursuit of Justice - most players agree that Long Arm of the Law is better, but i guess it does not matter much.
Fist of Justice - not important either, in fact, i did not use a single stun at all
Unbreakable Spirit - can be quite handy to bubble out of the Amber Globule every 2.5 minutes, but i don't think you will made such mistakes anyways.
Holy Avenger - VERY IMPORTANT. we really need this, especially for the boss fight at wave 5 and wave 10.
Light's Hammer - most of the waves can hit multiple mobs
Final Verdict - FV help increase the range of your DS, useful for wave 4, wave 7 and wave 9.


Special Note

Amber-Weave will often shoot Amber Globule towards you. you must try to lure the Amber Globule to hit another mob. because the mob will get a debuff which increase damage taken by 50% for 6 seconds, which is very helpful for you to kill the mob.

if you are about to finish a particular wave, you can keep 1 mob alive and stop dps. stock up 5 holy power and wait until the last few seconds so that you can enter the next wave with 5 holy power. this is not really necessary but it may help you to get pass a difficult wave that you often fail.


Wave 1: Amber x 3, Varmint x 6

Light's Hammer at the center (before the wave begun)

LH should hit all (6 varmint)

make good use of Amber Globule to kill the (3 amber) one by one


Wave 2: Mystic x 1, Amber x 1, Guardian x 2, Banshee x 1

Light's Hammer + Avenging Wrath before the wave begun

LH should hit 2 targets (1 guardian and 1 amber)

focus and kill the healer (1 mystic) while the first amber globule fly towards you
dps and kill the full health (1 guardian) with the help of the second amber globule
lure the third globule to center, hit the (1 banshee) when it appear

then finish off the remaining  (1 amber and 1 guardian)


Wave 3: Banana x 2, Varmint x 18

this wave has the most number of mobs but it is very easy.

use Thorasus, the Stone Heart of Draenor + Holy Avenger at the beginning, focus on the (2 banana) and cleaving them off

the ring explosion and your cleaving should easily kill the (18 varmint)


Wave 4: Amber x 1, Guardian x 4, Banshee x 1

Light's Hammer + Avenging Wrath before the wave begun

LH should hit 3 targets (2 guardian and 1 amber)

focus and kill a full health (1 guardian) while the first amber globule fly towards you
dps and kill another full health (1 guardian) with the help of the second amber globule
(1 banshee) will appear, run to the center, and kill it with the help of the third amber globule

then finish off the remaining 1 amber and 2 guardian asap


Wave 5: Mystic x 1, Banana x 1, Banshee x 1, Sha x 1

focus on the healer (1 mystic), interrupt a heal, and start to avoid the banana toss, kill the healer

chase after the (1 banana) and kill it

go back to center, wait for (1 banshee) to appear and dps it

then wait for the boss (1 sha) armor buff to disappear, Thorasus, the Stone Heart of Draenor + Holy Avenger to burst it down


Wave 6: Mystic x 2, Varmint x 6

Light's Hammer at the center, before the wave begun

LH should hit 6 targets (6 varmint)

the healers (2 mystic) will try to cast their heal on the varmints. this is the signal for you to take a Berserker buff on the floor, then use Avenging Wrath and focus on (1 mystic), killing it before their next heal is coming

next, you just dps the remaining (1 mystic) normally, interrupt the heal as and when he try to cast

the (6 varmint) should be pretty low health and can be easily killed


Wave 7: Banana x 1, Amber x 2, Guardian x 3

Light's Hammer directly on the (1 banana), before the wave begun. this will help slow down the banana mob, enough for you to dps and kill it before it brings you out of position.

the first and second amber globule come at the same time, it should hit (1 guardian at the center) and (1 amber) himself. when that happen, try to kill the (1 amber) first, and also try to bring down the (1 guardian at the center) as much as you can. if he still lives, make sure you don't waste any more amber globule on him anymore!

for the third amber globule, you should lure it to (1 guardian at the side) and dps it down

for the fourth amber globule, same thing, lure it to another (1 guardian at the side) and dps it down

for the fifth amber globule, lure it to the (1 amber) himself and kill him. at this time, the timer will be ending soon and the (1 guardian at the center) should be dead or almost dead.


Wave 8: Mystic x 1, Slayer x 2, Banshee x 3

focus on the healer (1 mystic), interrupt a heal, and try to dps it down.

the first banshee will appear suddenly, beside the healer, that is the signal for me to Thorasus, the Stone Heart of Draenor + Holy Avenger to burst down both the (1 banshee) and (1 slayer)

another (1 banshee) will appear around the time when my ring explode, hitting both the banshee as well as another (1 slayer)

the final (1 banshee) will appear immediately after that. for this one, we just dps it normally


Wave 9: Banana x 1, Slayer x 2, Guardian x 1, Banshee x 1, Amber x 1

Light's Hammer + Avenging Wrath before the wave begun

LH should hit 2 targets (1 guardian and 1 slayer)

focus and kill the (1 banana) asap so that you can start to make use of amber globule

the first amber globule should help you kill (1 slayer or 1 guardian)

the second amber globule will help you kill another (1 slayer or 1 guardian)

then position yourself at the center because (1 banshee) will appear, and kill it with the help of the third amber globule

then finish off the remaining (1 amber) and (1 slayer or guardian) asap


Wave 10: Boss Sha x 1

this is the hardest wave (if you don't have CD)

of course, this is the easiest and most relax wave since i already prepare the CD for him.

wait for the boss armor buff to disappear, then pop Thorasus, the Stone Heart of Draenor + Holy Avenger to burst it down
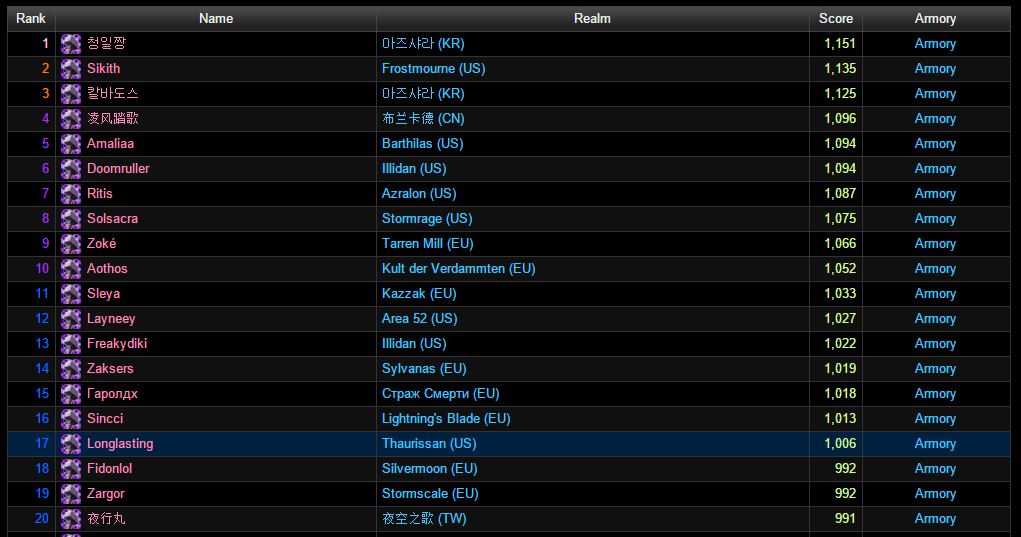

World Ranking

well, if you like to give proving ground a try, good luck and have fun with it! i am not sure how updated wowprogress is, but it shows that i am currently world rank 6 retribution paladin in endless dps proving grounds

Tuesday 22 December 2015

Warcraftlogs All Star World Ranking

when 6.2.3 first came out, everyone is still trying to figure out how to make full use of our upgraded gears. some boss fights are shorten significantly and because of new timing and new strategy, every guild can produce new dps record, therefore world ranking have become very unstable during the first couple weeks.

it has been one month since then, perhaps everything have become more or less stable now, or not?

anyways as i am writing this, my current standing is at world rank 17.


world number 17 ret pally? i have never expected that i could get up to such a high ranking. could be many reasons:

1) maybe people can't be bothered to log their kills anymore, because they don't care about farming mode?

2) maybe there are many top guilds who have already stop raids before the 6.2.3 valor upgrade, especially if they already got the mythic mount for all their raiders by now.

3) or ret pally players are more focus on doing mechanics correctly instead of meter-padding, probably not, right? lol

4) or HFC have been on-going for far too long and players have switch to other games already

5) or maybe RNG simply favors me at the moment, but of course, i am definitely doing my best as i can too :)

however, i doubt i can go any higher because this is not my focus anyways and my guild is more keen to keep to a "1 night" raiding per week schedule too. that means we probably won't be trying out new strategy and timing at the moment. but the good thing is that we can use the spare time for rated battlegrounds, doing achievements, PVP and mythic progression with alts, etc.

Thursday 17 December 2015

HFC Speed Farming Progression

after getting mythic archimonde and all HFC achievements for everyone, many guilds out there are currently still farming mythic HFC actively, my guild included.

why do we farm mythic HFC? first of all, we like to get mythic archimonde mount, Felsteel Annihilator, for every mythic raiders if possible. our rooster strength is around 26, and we only have 5 mounts now, so we still need another 20 weeks of farming.

secondly, farming can get boring, so we decided to spice things up, cut down healers, doing speed kills, going for higher individual rankings in warcraftlogs, etc. during farming mode, many things changes, fight length is reduced for each boss, sometimes strategy & legendary ring usage is also different. we have also reduce from 3 raid night per week to 1 raid night per week.

you can also think of speed farming as another kind of progression. cutting down healers can be risky, because mistakes will be more fatal, but it is necessary. speed farming is quite fun, however a few wipes is necessary to re-learn new timing and strategy.


Hellfire Assault

there are simply not enough mobs for everyone to dps in this fight. mobs die ridiculously fast and the majority of the time are idle-ing around, doing nothing, and the fight length cannot be reduced, so we can't rank this fight at all.

the only way is to ask half the raiders to afk this week so that the other half can rank.


Iron Reaver

dps is strong enough to down the boss with 0 air phase now. progression for this boss had gone from 2 air phase to 1 air phase to 0 air phase.

the top parses are using 0 heal or 0 tank and they actually reduce iron reaver into a 30-60 seconds fight. that means our 3 charges of AW must be squeeze inside the short fight and we will need to use a cancel macro in order to fully utilized our wings of liberty buff.

this is the cancer macro *ahem, i mean cancel macro

/cancelaura avenging wrath
/cast avenging wrath
/cast seraphim


Kromrok

to get the highest dps for this boss, you want to end the fight swiftly right after the dragging hands aoe, because that is when our dps burst is at the highest. 1st dragging hand came at around 30 seconds after pull, which is too soon for consideration.

we can try planning for the 2nd or 3rd dragging hand, both timing should be great for ranking. but if we use 2 healers, we probably be able to kill the boss by the 2nd dragging hand.


Council

during progression, we always focus on gurtogg as first priority to reduce raid damage and debuff stacks. we can't do that now because gurtogg will die too fast. to rank well on this fight, you will like to have gurtogg Fel Rage on you. it would be ideal if we allow gurtogg to be alive long enough to get 2 fel rage.

anyways, our dps is high enough that we can bring down both jubei and gurtogg together at the same time and killing both of them before the first storm phase come.


Kilrogg

nowadays, raid dps is so high, by the time the first vision team came out, the boss is already dying, or closed to dead.

we have to take turns to rank, 2 dps every week. the only way to rank for this fight, is to have the whole raid stop dps when boss is around 50% hp and wait until the 2 minute mark. when the 2 dps exit the vision room, their superman dps will kill the boss quickly.


Gorefiend

speed kill is the best way to rank on this boss. the kill timing can be lower from 3 soul feast to 2 soul feast to 1 soul feast. for 1 soul feast, it means dps does not need to waste time soaking the souls any more, and focus on boss dps for the entire soul feast duration, which will yield a much higher dps rank.


Iskar

previously, we use legendary ring is avilable for each phantasamal / add phase. now we finish the ground phase fast enough that legendary ring will never be available at the 2nd add phase.

our current strat is not top-tier:

1st add - legendary ring
2nd add - bloodlust
3rd add - legendary ring

the top parses for this boss has a very different strategy. the range continue to dps the boss in air, while the melee take down the adds on ground, and the boss actually went into another add phase while still in the air! my guild probably won't be trying this strategy for now.

1st add - legendary ring, explode on boss in the air


Scorethar

during progression, we always use 2 legendary ring for 2 dominator. for speed kill, there will only be 1 dominator in the whole fight so the best is using the ring on pull and again around 2 min. this should reduce the fight length significantly.

AW1 - ring on pull
AW2 - immediate after AW1
AW3 - after dominator is dead, ES and AW on boss
AW4 - ring at 2 min


Fel Lord Zakuun

ranking depends totally on speed kill too. cut down to 1 or 2 healer and the boss won't even have the chance to enter phase 2. there will only be 1 seed to handle in the whole fight. we don't even need melee to soak the puddles anymore and i don't have to enter the soul cleave phase either. i just simply AW 3 times in a row and the boss is dead. everything became so easy.


Tyrant

during progression, we used to timed the legendary ring strategically during p2. now that everyone is so geared, it doesn't matter anymore, we just simply use the ring on cooldown. this is very good for me too, since i don't have to estimate how much i need to delay my seraphim to sync with the ring.

for dps ranking, i believe the best is to keep all our AW padding for p3

AW1 - p1 ring on pull
AW2 - p2 ring on CD
AW3 - immediate after AW2
AW4 - immediate after AW3
AW5 - ring on CD if boss still alive


Xhul'horac

same as tyrant during progression, we used to delay the legendary ring for the last phase to burn down the boss asap. for better ranking and speed kill, we should use the legendary ring whenever it is up. and also pray that the boss don't choose you for fel surge too often.


Mannoroth

it quite dangerous to speed kill this boss unless we plan ahead in advance. for example, if we transit to a new phase while a doom lord is spawning, it can easily lead to a wipe. so it takes a bit of trial and error to determine whether it can be done before we push through it, sometimes we have to hold dps, which can be quite annoying because i still need to maintain 3 LOV stacks while holding dps.

during progression, i timed my AW around 5 doomlord but now we only have 3 doomlord so i can re-plan my AW usage.

AW1 - ring 1 on mannoroth, explode on 1st doomlord
AW2 - for 2nd doomlord
AW3 - ring 2
AW4 - for 3rd doomlord
AW5 - ring 3

as for ranking, i may consider planning my AW on the imps instead.


Archimonde

last month, we have 2 doomfire, 5 deathcaller, 4 infernal. this month, we have cut down to 1 doomfire, 4 deathcaller, 3 infernal. since we can kill the adds faster now, there will be lesser mechanics that overlap one another, making things much easier to handle.

Sunday 13 December 2015

The Legendary Ring and Seraphim


the legendary ring, is and always will be a very special and unique experience to raiding. i never expect an individual item to be so involved, in the way guild leaders has to decide how to use the ring, as well as the strategy that often come with it.

hats off to blizzard, for they managed to design a ring to have such an important role towards teamwork for all raiders in WOD. of course, there will always be haters to the way it is designed. for myself, i guess i hate and love it at the same time, lol.


Do you hate it?

in my guild, i don't control the ring. and to be frank, it is quite challenging as a retribution paladin because of the way Seraphim work. seraphim has a 30 seconds CD, and each time, it requires us to build up 5 holy-power to use it.  in order to be on time for the legendary ring 2 minute CD, it means we have to execute 4 x seraphim perfectly.

if we screw up our rotation, or forgot to pool 5 holy-power, or ring on-pull, and delay seraphim by 5-7 seconds. it means we have to forgo the next seraphim or we will never be able to sync with the legendary ring for the rest of the fight.

another problem is when the legendary ring is used on a specific moment, based on guild strategy. for example, sometimes the ring is delayed for the boss final phase, let's say fel lord at 30% or xhul'horac at 20%. it is very difficult to judge how long the raid will take to bring the boss down to a specific hp%. this requires a lot of experience and analytical skills on your part to execute seraphim properly.


Do you like it?

the reward is really tremendous.

imagine you are currently doing 10000 dps

avenging wrath increase damage by 20%, excluding Wings of Liberty
strength potion increase damage by ~ around 11%
bloodlust increase haste by 30%
class libram increase damage by 6.37% x 3 stacks
legendary ring increase damage by 44% and another 44%
seraphim increase damage by ~ around 46%

10000 dps x 1.3 bloodlust x 1.11 potion x 1.2 wing x 1.1911 class trinket = 20625 dps

using all your major CD together actually managed to double our dps from 10k to 20k. if we also use the ring...

20625 dps x 1.44 ring x 1.44 explosion = 42768 dps

our dps already increase from 10k dps to 42k dps, because the ring was activated with all the major CD. now if we add seraphim on top of all these multiplier, it will be a great boost.

42768 dps x 1.46 seraphim = 62441 dps !!

you have to understand that each multiplier effects can stack on top of each other, and everything will chain together into a powerful burst.

i have to admit how joyful it is whenever i managed to sync seraphim and the legendary ring together. because it is so rewarding, in terms of dps, and lots of satisfaction due to perfect execution on my part as well. of course, it is also very disheartening when i did not sync it perfectly.


The Initial Pull

different guilds use the ring differently.


if you are the ring controller

if you are, then the best is to use the ring after building 5 holy-power, which is around 7 seconds. your opening will be C > J > E > C > J > ES > RING & AW & Sera > HoW > C > HoW > V


if ring is use immediately on pull

my guild like to use the ring immediately on pull. the best way is to use AW first, and build up 5 holy-power asap and use seraphim. my opening is always C (RING use) > ES (use AW) > HoW > C > HoW > J (use Sera) > HoW > C > HoW > V

1 sec = RING & ES & AW
7 sec = Sera
37 sec = important, do not use Sera here!
60 sec = ES & AW & Sera
90 sec = Sera
120 sec = RING & ES & AW & Sera (all sync up nicely)

Tuesday 8 December 2015

Handle FVEDS proc during AW and FV


how to handle FVEDS proc during Avenging Wrath and maintaining 3 stacks of Libram of Vindication? this is a situation you will face very often whenever you use Final Verdict together with our class trinket.

our class trinket only give us a short amount of time, 10 seconds, where we must use a crusader strike to renew the buff duration or the 3 stacks will be gone. normally, 10 seconds is more than enough because crusader strike is 1 of our most used abilities in our dps rotation.

however, things changed when we are using AW (in Sanctified Wrath spec) , because we focus on using Hammer of Wrath as much as possible during this period and it became worse when FVEDS proc, making us unable to refresh the 3 stacks of LOV on time.


FVEDS may screw up your LOV stacks

during AW-SW, our dps rotation = hammer > FVEDS / crusader > hammer > verdict

when i don't have bloodlust, i only have around 16.11% after raid buff.

for example, you are at 2 holy-power now, with 3 LOV stacks, and decided to use AW.

dps rotation = hammer, crusader, hammer, verdict (proc), hammer, FVEDS, hammer, verdict, hammer, crusader (TOO LATE !!!)

look at this table below and you can see that we will be too slow to refresh the LOV stacks if we are using the standard priority dps rotation.


there are 4 different ways which i can think of what we can do to handle FVEDS proc:

choice 1 - stick to our dps priority standard rotation and accept that LOV will reset

choice 2 - replace a hammer with a crusader to refresh the LOV before it expire

choice 3 - don't use the FVEDS and stick to HoW > C > HoW > FV throughout

choice 4 - refresh the LOV and go beyond 5 holy power

choice 5 - get more than 20% haste !! but this is unrealistic at the moment, haha.

so for choice 1 to 4, which is the better choice? let's do the maths


Character Stats

a mythic BiS geared and 2/2 upgraded paladin have around 8500 strength buffed

8500 strength
3% versatility

and the archimonde weapon

3.6 weapon speed
875.83 weapon dps


Ability Damage

we are only interested with the damage of these 4 abilities:-

Hammer of Wrath = 27315.60
Final Verdict = average 38759.90
Crusader Strike = average 12926.43
FVEDS = same damage as final verdict, average 38759.90

LOV 3 stacks = 6.37% x 3 = 19.11%

WOL = wings of liberty, our tier set buff for the initial 10 seconds of AW

if you like to know how i calculate the damage of these abilities, kindly refer to my earlier blog post here: 6.2.3 Ability Damage Formula


Choice 1 - Stick to DPS rotation and LOV reset

ok, so we accept the fact that our normal rotation causes LOV stacks to reset.

let's take a look at 1 FVEDS proc vs 2 FVEDS proc during the wings of liberty.


let's take a look at 1 FVEDS proc vs 2 FVEDS proc after the wings of liberty.

choice 1 result = 955365, 977136, 940595, 967418


Choice 2 - Replace HoW with Crusader Strike

ok for this choice, we are forced to use a crusader strike earlier than we wanted, because we don't want to lose the 3 LOV stacks.

let's take a look at 1 FVEDS proc vs 2 FVEDS proc during the wings of liberty.


let's take a look at 1 FVEDS proc vs 2 FVEDS proc during the wings of liberty.


choice 1 result = 955365, 977136, 940595, 967418
choice 2 result = 996103, 996103, 981333, 981333


Choice 3 - Ignore FVEDS and stick to H>C>H>V rotation


ok, so we decided not to deal with the annoying FVEDS proc and stick to a simple rotation.


choice 1 result = 955365, 977136, 940595, 967418
choice 2 result = 996103, 996103, 981333, 981333
choice 3 result = 928051 throughout


Choice 4 - Refresh LOV and go beyond 5 Holy Power

choice 4 is definitely an interesting choice, let's see how it fares!

1 FVEDS vs 2 FVEDS during the wings of liberty:


1 FVEDS vs 2 FVEDS after the wings of liberty:


all right, we have the answer for all the 4 choices now.


The Best Choice is ...


putting the result together,

choice 1 result = 955365, 977136, 940595, 967418
choice 2 result = 996103, 996103, 981333, 981333
choice 3 result = 928051 throughout
choice 4 result = 979745, 979745, 964976, 964976

seems like choice 2 is the winner. but, if you look carefully, different choices ends with different amount of holy-power.

choice 1 holy power ends at 4, 3, 4, 3
choice 2 holy power ends at 0, 3, 0, 3
choice 3 holy power ends at 5, 5, 5, 5
choice 4 holy power ends at 3, 5, 3, 5

3 holy-power can give us a FV, which is an extra damage average 46167, outside of AW.
so each holy-power can potentially means 15389 damage

choice 1 modified result = 1007044, 1015896, 992275, 1006177
choice 2 modified result = 996103, 1034863, 981333, 1020093
choice 3 modified result = 992651, 992651, 992651, 992651
choice 4 modified result = 1018505, 1044345, 1003736, 1029575

after the consideration of holy-power, it looks like the difference between all 4 choices are actually quite small although the winner is choice 4... haha, have you ever think about going beyond 5 holy power? it used to be frown upon, because it is generally understandable that going above 5 holy power is a waste, and only bad ret pally does that, right?

when i label this as a choice 4 initially, i thought it was just a silly idea. perhaps i am the only one who even think of going beyond 5 holy power, but, as it stands, may be the best solution to the problem of LOV and FV during AW.


Choice 5 - The Unrealistic 20% Haste?

yeah, choice 5 is the most ideal choice, but it won't happen unless you have bloodlust.


choice 2 result = 996103, 996103, 981333, 981333

choice 5 result = 1095048, 1095048, 1043354, 1043354

yup, this means for the duration of bloodlust, we don't have to worry about LOV stacks falling off even when we perform the dps priority rotation and using the FVEDS proc.

Wednesday 2 December 2015

Felmouth Frenzy vs 125 Stats Mastery

the most common question is which one is better? the food buff 125 stats vs felmouth fenzy. 125 stats is straight forward but felmouth fenzy is a RRPM (real proc per minute) Fel Lash, when it proc, it shoot a shadow bolt to the enemy im targetting.

icy-vein recommend felmouth for single target bosses, with mechanics that force you to move out of range from boss because RRPM will help to cover up the dps loss from moving, but after 2 weeks of testing, this is what i've observed.


How much does Sleeper Sushi give us?

firstly, we calculate how much does an additional 125 mastery help us. to be precise, it is more than 125, because retribution paladin has Righteous Vengeance, which give us 125 x 1.05 = 131.25 mastery.

131.25 mastery is around 2.53% mastery at level 100
let's say for a mythic geared paladin, you have 80% mastery after raid buff, then eating sleeper sushi will boost it to 82.53% mastery

82.53 ÷ 80 = 1.031625, which is an additional 3.1625% increase damage to our hands of light.

for example,


this is 1 of my Socrethar Log where i am using felmouth food buff.

fel lash total damage is only 204.1k

sleeper sushi could have given me 238k damage. because hand of light damage would be 3.1625% stronger, which is 0.031625 x 7.55m = 238k damage.

socrethar is mostly single-target, so i am surprised sleeper sushi could have given me more dps than felmouth here.


Felmouth is best for which fight? Single-Target?

icy vein recommend the best boss to use felmouth is fel lord zakuun, because it is pure single-target and it has mechanics that force you to move out of range of the boss.

i happen to have a perfect example where i've to enter the soul phase, as well as running out for seed!


let's take a look at this particular Fel Lord Zakuun Log


my fel lash give me 142k damage

sleeper sushi could have given me 0.031625 x 5.88m = 186k damage

isn't this already the perfect example as explained in icy vein, but why does sleeper sushi still give me more in this case?

i'll explain later on


Felmouth is best for which fight? AOE Situation?

ok let's take a look at some AOE situation, for example, this particular Mannoroth Log where my divine storm dps is at the top, which should be pretty bad for felmouth?


fel lash give me a whooping 435k damage !!

sleeper sushi could have given me 0.031625 x 10.95m = 346k damage

let's take a look at another AOE heavy fight, such as Xhul'horac

i have a Xhul'horac Log here


my fel lash give me 228.4k damage

sleeper sushi could have given me 0.031625 x 7.27m = 229k damage

this happen to be a draw!


What are the main factors?

as we can see, felmouth can perform badly on single-target such as Fel Lord and Scorethar. on the other hand, it can also perform well at AOE situation such as Xhul'horac and Mannoroth. so what is happening?

the answer will surprise you,

single-target or AOE is such an insignificant factor that you can basically ignore it.

because the main factor is due to our trinkets and our spec!

and some particular boss fights which i'll explain later.


1) Felmouth is not affected by secondary stats!

from all the logs, i have never seen fel lash crit or multistrike. it is also not affected by mastery and the proc rate does not increase due to higher haste either.

this means that felmouth will under-perform if i am using Seraphim. and likewise if i am using trinket such as Vial of Convulsive Shadows too.

felmouth does not benefit from these secondary stats but sleeper sushi does!


2) Felmouth is not affected by damage multiplier effects!

during my test, i realize that having 3 stacks of LOV does not increase the damage of my fel lash. this is the main reason why felmouth under-perform in single-target situation like fel lord zakuun / scorethar!

felmouth will also be useless on bosses which provide us some damage multiplier. for example, in tyrant velhari, we have a stacking damage buff in phase 3. unfortunately, the fel lash damage remains the same.

this is my Tyrant Velhari Log, zoomed into the phase 3


my fel lash give me 91.1k damage during tyrant phase 3

sleeper sushi could have given me 0.031625 x 7.77m = 246k damage during phase 3

as you can see, multiplier effect is very bad for felmouth frenzy

there are many more bosses in HFC such as:

Fel Rage - hellfire council, gurtogg fel rage
Feast of Souls - gorefiend soul feast
Undying Resolve - 20 stacks in kilrogg vision room
Aura of Malice - tyrant velhari phase 3, stacking buff every 5 seconds

and our class trinket is also one such example:

Libram of Vindication - my mythic LOV will be 6.37% x 3


3) Felmouth is only affected by Strength!

the shadow damage of the Fel Lash is purely based on our main stat, which is strength. it is not based on item-level because when i was equipping my standard HFC gears, with EDH and DC, fel lash damage average around 3.3k.

then i swap my DC into LOV, hoping that it would also apply the damage multiplier from the 3 stacks LOV, but unfortunately no, the fel lash average drop to 3k damage instead, which is even lower despite having a higher item-level, mainly because i lost 576 strength by swapping the DC into LOV.

because felmouth frenzy only make use of our main stat, it does not scale up as fast as our gears.

i remember when we are still at level 700, fel lash damage can be as high as 3% of our total damage at that time. but as we go higher item-level, at 730, it drop to around 1%, and now the valor upgrade is going to drive us above 740, making felmouth frenzy even weaker.


Any boss worth using felmouth?

an easy way to determine is by looking at your hand of light damage. i have observed in most of my logs, hand of light damage is usually very close to 30% of my total damage, irregardless single-target or AOE, it seems to be around 30% anyways. sleeper sushi offer a 3% increase of a 30%, which is very close to a 1% increase overall. if your fel lash can do around 1% of your total damage, it should be worth using.

just to summarized, damage multiplier effects, Seraphim and Libram of Vindication will bring down the value of felmouth. retribution paladin often use seraphim and LOV for single-target bosses such as iron reaver, council, kilrogg, gorefiend, scorethar and tyrant, and felmouth is going to perform badly on all of them.

it may be worth using on bosses when you are using final-verdict, and with trinkets like UH or DC, on bosses such as hellfire assault, iskar, xhul'horac, mannoroth and archimonde. but once you are on farm mode, being able to focus on dps padding instead of target-switching, you will start using LOV on xhul, manny and archi as well, making felmouth weak.

felmouth is strong when you at a lower item-level. but as you go towards the end game, the more geared you are, the more useless felmouth will become. so im a bit regret to consider felmouth so late into the game now, because i could have benefit from it when im still progressing HFC at a lower item-level.