
endless wave 123 screenshot
i decided to give proving ground endless dps a run on Sunday. i did better in dps as compared to the healer/tank proving ground but i didn't expect to go above wave 100 so smoothly.
CD Planning
the most important thing you need to prepare is to decide when to use your major cooldown. there are only 10 different waves and it keeps repeating itself so we should stick to the same strategy. for example, wave 11 is same as 1, and wave 12 is the same as wave 2, but mobs hp increased by 10%.
every wave is 1 minute long, which is why we can (and should) use our CD so often. i feel it is easier to split up my CD so that i have something to use on almost every wave.
CD combo 1 = Thorasus, the Stone Heart of Draenor + Holy Avenger
CD combo 2 = Light's Hammer + Avenging Wrath
the hardest wave in my opinion (without using CD) is 10 > 5 > 4 > 9
CD combo 1 is stronger so i plan to use this combo for the 2 boss fight, which is wave 5 and wave 10. this also means CD combo 1 can be re-use for wave 3 and wave 8.
the arrangement of CD does not have to be the best setup because the main idea is to form a habit. practise a few times for efficiency and everything will automatically became easier after it gets into your muscle memory. for example, this is my plan:
wave 1 - Light's Hammer
wave 2 - Light's Hammer + Avenging Wrath
wave 3 - Thorasus, the Stone Heart of Draenor + Holy Avenger
wave 4 - Light's Hammer + Avenging Wrath
wave 5 - Thorasus, the Stone Heart of Draenor + Holy Avenger
wave 6 - Light's Hammer + Avenging Wrath
wave 7 - Light's Hammer
wave 8 - Thorasus, the Stone Heart of Draenor + Holy Avenger
wave 9 - Light's Hammer + Avenging Wrath
wave 10 - Thorasus, the Stone Heart of Draenor + Holy Avenger
very important note - make sure you keep to your plan as faithfully as possible. if you forget to use the CD, just forget it and move on, do not try to use it at the wrong time and screw up your own plan later.
by right, we can use the Light's Hammer in every single wave. but you must throw it down a few seconds before the wave actually begun, otherwise it will not be ready for the next wave. however, i would advise you NOT to use Light's Hammer on wave 3, wave 5 and wave 8, because it is critical for wave 4, wave 6 and wave 9.
BiS Gears
i am not sure what is "BiS" for proving grounds but i know it is very similar to CM dungeon.
because:
1) tier set does not work
2) sockets does not work
3) mobs will scale with our item-level accordingly.
however:
1) legendary ring works
since it is similar to CM, i went ahead to equip all my CM gears, which is my haste & mastery set. but i swap 1 of my CM ring into the legendary ring.
Trinkets
just for your info, i am simply using my CM gears, and my CM trinkets are EDH and DC.
although i have a feeling it might be best to use 1 passive and 1 on-use trinket (scabbard or vial) instead. but i didn't really have time to test these choices because it takes 1 hour to reach wave 60 and 2 hours to reach wave 120.
the higher waves (100+) is where things matters but it is too time-consuming to test out these trinkets... imagine 1 hour of proving ground to test 1 trinket!
therefore, i did not plan for trinkets at all. come to think of it, perhaps it doesn't really matters much, since i can go above wave 100 with EDH and DC, it should be good enough, right? lol
Talents / Specs
Pursuit of Justice - most players agree that Long Arm of the Law is better, but i guess it does not matter much.
Fist of Justice - not important either, in fact, i did not use a single stun at all
Unbreakable Spirit - can be quite handy to bubble out of the Amber Globule every 2.5 minutes, but i don't think you will made such mistakes anyways.
Holy Avenger - VERY IMPORTANT. we really need this, especially for the boss fight at wave 5 and wave 10.
Light's Hammer - most of the waves can hit multiple mobs
Final Verdict - FV help increase the range of your DS, useful for wave 4, wave 7 and wave 9.
Special Note
Amber-Weave will often shoot Amber Globule towards you. you must try to lure the Amber Globule to hit another mob. because the mob will get a debuff which increase damage taken by 50% for 6 seconds, which is very helpful for you to kill the mob.
if you are about to finish a particular wave, you can keep 1 mob alive and stop dps. stock up 5 holy power and wait until the last few seconds so that you can enter the next wave with 5 holy power. this is not really necessary but it may help you to get pass a difficult wave that you often fail.
Wave 1: Amber x 3, Varmint x 6
Light's Hammer at the center (before the wave begun)
LH should hit all (6 varmint)
make good use of Amber Globule to kill the (3 amber) one by one
Wave 2: Mystic x 1, Amber x 1, Guardian x 2, Banshee x 1
Light's Hammer + Avenging Wrath before the wave begun
LH should hit 2 targets (1 guardian and 1 amber)
focus and kill the healer (1 mystic) while the first amber globule fly towards you
dps and kill the full health (1 guardian) with the help of the second amber globule
lure the third globule to center, hit the (1 banshee) when it appear
then finish off the remaining (1 amber and 1 guardian)
Wave 3: Banana x 2, Varmint x 18
this wave has the most number of mobs but it is very easy.
use Thorasus, the Stone Heart of Draenor + Holy Avenger at the beginning, focus on the (2 banana) and cleaving them off
the ring explosion and your cleaving should easily kill the (18 varmint)
Wave 4: Amber x 1, Guardian x 4, Banshee x 1
Light's Hammer + Avenging Wrath before the wave begun
LH should hit 3 targets (2 guardian and 1 amber)
focus and kill a full health (1 guardian) while the first amber globule fly towards you
dps and kill another full health (1 guardian) with the help of the second amber globule
(1 banshee) will appear, run to the center, and kill it with the help of the third amber globule
then finish off the remaining 1 amber and 2 guardian asap
Wave 5: Mystic x 1, Banana x 1, Banshee x 1, Sha x 1
focus on the healer (1 mystic), interrupt a heal, and start to avoid the banana toss, kill the healer
chase after the (1 banana) and kill it
go back to center, wait for (1 banshee) to appear and dps it
then wait for the boss (1 sha) armor buff to disappear, Thorasus, the Stone Heart of Draenor + Holy Avenger to burst it down
Wave 6: Mystic x 2, Varmint x 6
Light's Hammer at the center, before the wave begun
LH should hit 6 targets (6 varmint)
the healers (2 mystic) will try to cast their heal on the varmints. this is the signal for you to take a Berserker buff on the floor, then use Avenging Wrath and focus on (1 mystic), killing it before their next heal is coming
next, you just dps the remaining (1 mystic) normally, interrupt the heal as and when he try to cast
the (6 varmint) should be pretty low health and can be easily killed
Wave 7: Banana x 1, Amber x 2, Guardian x 3
Light's Hammer directly on the (1 banana), before the wave begun. this will help slow down the banana mob, enough for you to dps and kill it before it brings you out of position.
the first and second amber globule come at the same time, it should hit (1 guardian at the center) and (1 amber) himself. when that happen, try to kill the (1 amber) first, and also try to bring down the (1 guardian at the center) as much as you can. if he still lives, make sure you don't waste any more amber globule on him anymore!
for the third amber globule, you should lure it to (1 guardian at the side) and dps it down
for the fourth amber globule, same thing, lure it to another (1 guardian at the side) and dps it down
for the fifth amber globule, lure it to the (1 amber) himself and kill him. at this time, the timer will be ending soon and the (1 guardian at the center) should be dead or almost dead.
Wave 8: Mystic x 1, Slayer x 2, Banshee x 3
focus on the healer (1 mystic), interrupt a heal, and try to dps it down.
the first banshee will appear suddenly, beside the healer, that is the signal for me to Thorasus, the Stone Heart of Draenor + Holy Avenger to burst down both the (1 banshee) and (1 slayer)
another (1 banshee) will appear around the time when my ring explode, hitting both the banshee as well as another (1 slayer)
the final (1 banshee) will appear immediately after that. for this one, we just dps it normally
Wave 9: Banana x 1, Slayer x 2, Guardian x 1, Banshee x 1, Amber x 1
Light's Hammer + Avenging Wrath before the wave begun
LH should hit 2 targets (1 guardian and 1 slayer)
focus and kill the (1 banana) asap so that you can start to make use of amber globule
the first amber globule should help you kill (1 slayer or 1 guardian)
the second amber globule will help you kill another (1 slayer or 1 guardian)
then position yourself at the center because (1 banshee) will appear, and kill it with the help of the third amber globule
then finish off the remaining (1 amber) and (1 slayer or guardian) asap
Wave 10: Boss Sha x 1
this is the hardest wave (if you don't have CD)
of course, this is the easiest and most relax wave since i already prepare the CD for him.
wait for the boss armor buff to disappear, then pop Thorasus, the Stone Heart of Draenor + Holy Avenger to burst it down
World Ranking
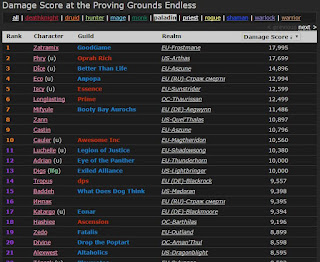
well, if you like to give proving ground a try, good luck and have fun with it! i am not sure how updated wowprogress is, but it shows that i am currently world rank 6 retribution paladin in endless dps proving grounds
1) legendary ring works
since it is similar to CM, i went ahead to equip all my CM gears, which is my haste & mastery set. but i swap 1 of my CM ring into the legendary ring.
Trinkets
just for your info, i am simply using my CM gears, and my CM trinkets are EDH and DC.
although i have a feeling it might be best to use 1 passive and 1 on-use trinket (scabbard or vial) instead. but i didn't really have time to test these choices because it takes 1 hour to reach wave 60 and 2 hours to reach wave 120.
the higher waves (100+) is where things matters but it is too time-consuming to test out these trinkets... imagine 1 hour of proving ground to test 1 trinket!
therefore, i did not plan for trinkets at all. come to think of it, perhaps it doesn't really matters much, since i can go above wave 100 with EDH and DC, it should be good enough, right? lol
Talents / Specs
Pursuit of Justice - most players agree that Long Arm of the Law is better, but i guess it does not matter much.
Fist of Justice - not important either, in fact, i did not use a single stun at all
Unbreakable Spirit - can be quite handy to bubble out of the Amber Globule every 2.5 minutes, but i don't think you will made such mistakes anyways.
Holy Avenger - VERY IMPORTANT. we really need this, especially for the boss fight at wave 5 and wave 10.
Light's Hammer - most of the waves can hit multiple mobs
Final Verdict - FV help increase the range of your DS, useful for wave 4, wave 7 and wave 9.
Special Note
Amber-Weave will often shoot Amber Globule towards you. you must try to lure the Amber Globule to hit another mob. because the mob will get a debuff which increase damage taken by 50% for 6 seconds, which is very helpful for you to kill the mob.
if you are about to finish a particular wave, you can keep 1 mob alive and stop dps. stock up 5 holy power and wait until the last few seconds so that you can enter the next wave with 5 holy power. this is not really necessary but it may help you to get pass a difficult wave that you often fail.
Wave 1: Amber x 3, Varmint x 6
Light's Hammer at the center (before the wave begun)
LH should hit all (6 varmint)
make good use of Amber Globule to kill the (3 amber) one by one
Wave 2: Mystic x 1, Amber x 1, Guardian x 2, Banshee x 1
Light's Hammer + Avenging Wrath before the wave begun
LH should hit 2 targets (1 guardian and 1 amber)
focus and kill the healer (1 mystic) while the first amber globule fly towards you
dps and kill the full health (1 guardian) with the help of the second amber globule
lure the third globule to center, hit the (1 banshee) when it appear
then finish off the remaining (1 amber and 1 guardian)
Wave 3: Banana x 2, Varmint x 18
this wave has the most number of mobs but it is very easy.
use Thorasus, the Stone Heart of Draenor + Holy Avenger at the beginning, focus on the (2 banana) and cleaving them off
the ring explosion and your cleaving should easily kill the (18 varmint)
Wave 4: Amber x 1, Guardian x 4, Banshee x 1
Light's Hammer + Avenging Wrath before the wave begun
LH should hit 3 targets (2 guardian and 1 amber)
focus and kill a full health (1 guardian) while the first amber globule fly towards you
dps and kill another full health (1 guardian) with the help of the second amber globule
(1 banshee) will appear, run to the center, and kill it with the help of the third amber globule
then finish off the remaining 1 amber and 2 guardian asap
Wave 5: Mystic x 1, Banana x 1, Banshee x 1, Sha x 1
focus on the healer (1 mystic), interrupt a heal, and start to avoid the banana toss, kill the healer
chase after the (1 banana) and kill it
go back to center, wait for (1 banshee) to appear and dps it
then wait for the boss (1 sha) armor buff to disappear, Thorasus, the Stone Heart of Draenor + Holy Avenger to burst it down
Wave 6: Mystic x 2, Varmint x 6
Light's Hammer at the center, before the wave begun
LH should hit 6 targets (6 varmint)
the healers (2 mystic) will try to cast their heal on the varmints. this is the signal for you to take a Berserker buff on the floor, then use Avenging Wrath and focus on (1 mystic), killing it before their next heal is coming
next, you just dps the remaining (1 mystic) normally, interrupt the heal as and when he try to cast
the (6 varmint) should be pretty low health and can be easily killed
Wave 7: Banana x 1, Amber x 2, Guardian x 3
Light's Hammer directly on the (1 banana), before the wave begun. this will help slow down the banana mob, enough for you to dps and kill it before it brings you out of position.
the first and second amber globule come at the same time, it should hit (1 guardian at the center) and (1 amber) himself. when that happen, try to kill the (1 amber) first, and also try to bring down the (1 guardian at the center) as much as you can. if he still lives, make sure you don't waste any more amber globule on him anymore!
for the third amber globule, you should lure it to (1 guardian at the side) and dps it down
for the fourth amber globule, same thing, lure it to another (1 guardian at the side) and dps it down
for the fifth amber globule, lure it to the (1 amber) himself and kill him. at this time, the timer will be ending soon and the (1 guardian at the center) should be dead or almost dead.
Wave 8: Mystic x 1, Slayer x 2, Banshee x 3
focus on the healer (1 mystic), interrupt a heal, and try to dps it down.
the first banshee will appear suddenly, beside the healer, that is the signal for me to Thorasus, the Stone Heart of Draenor + Holy Avenger to burst down both the (1 banshee) and (1 slayer)
another (1 banshee) will appear around the time when my ring explode, hitting both the banshee as well as another (1 slayer)
the final (1 banshee) will appear immediately after that. for this one, we just dps it normally
Wave 9: Banana x 1, Slayer x 2, Guardian x 1, Banshee x 1, Amber x 1
Light's Hammer + Avenging Wrath before the wave begun
LH should hit 2 targets (1 guardian and 1 slayer)
focus and kill the (1 banana) asap so that you can start to make use of amber globule
the first amber globule should help you kill (1 slayer or 1 guardian)
the second amber globule will help you kill another (1 slayer or 1 guardian)
then position yourself at the center because (1 banshee) will appear, and kill it with the help of the third amber globule
then finish off the remaining (1 amber) and (1 slayer or guardian) asap
Wave 10: Boss Sha x 1
this is the hardest wave (if you don't have CD)
of course, this is the easiest and most relax wave since i already prepare the CD for him.
wait for the boss armor buff to disappear, then pop Thorasus, the Stone Heart of Draenor + Holy Avenger to burst it down
World Ranking
well, if you like to give proving ground a try, good luck and have fun with it! i am not sure how updated wowprogress is, but it shows that i am currently world rank 6 retribution paladin in endless dps proving grounds

